Metallic Thread — Add some Glitz!

posted in: Classes, Thread | 0

Hope you are enjoying my conversations about various threads and needles and decorative stitching.  No thoughts would be complete without talking about metallic thread.  I can already hear the “ugh’s” and “My machine doesn’t like that thread”…  I am here to tell you that your machine doesn’t really know what he likes.  He knows how he likes it presented to him.  (Have you noticed that I always refer to my machine as “he”? Not sure what that is about, but maybe it’s the only “he” that ever does what I ask!!)


Machine Embroidery with metallic thread


It doesn’t matter if you are using your embroidery machine, free motion quilting or doing controlled decorative stitching on your sewing machine, I have a “cheat sheet” that will help you with the correct way to present metallic thread to your sewing machine.

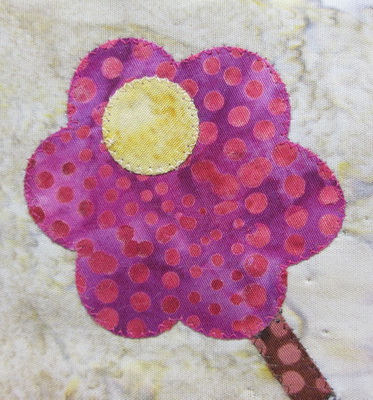
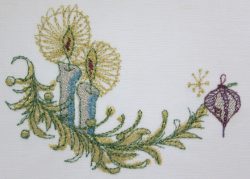
The design to the right was done on my Brother Dream Machine because it was a built in design. It was totally stitched with metallic thread.  There are 7 colors and 3 different brands, Brother, Sulky and some old Gutterman I had. The results were great with all 3 brands.


Machine Embroidery and metallic thread


The tree was also done on the embroidery machine and the total run time for the gold metallic was 15 minutes.  I didn’t have any thread breaks.  I actually went off to do something else and came back and I had a tree!

This design would be wonderful on a guest towel for the holidays….just don’t let them use it!!


Decorative Stitching with metallic thread
Free motion quilting with metallic thread


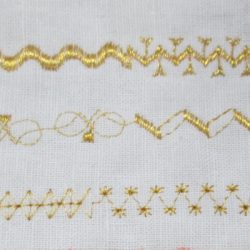
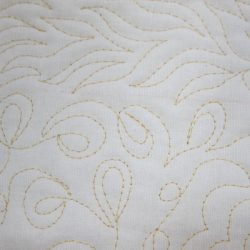
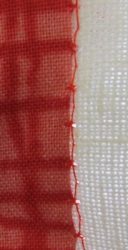
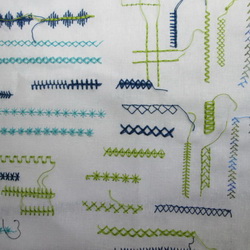
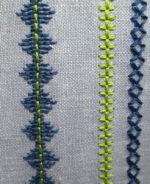
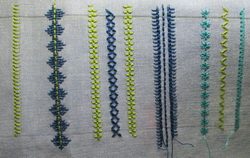
Metallic thread also works when you are doing decorative stitching or free motion quilting.  You can use all those great detailed stitches on your machine that don’t really look good if the thread is heavy.

I’m definitely not an expert at free motion quilting, but my doodles look great with metallic thread.  I’m best if I work in a small area at a time.


I don’t have any big secrets to enjoy working with metallic thread, I use some specific settings for my machine:

      1.  Use a good quality metallic thread – not the cheapest thing you can find online or a big box store.  Check with a machine dealer. There is no need to purchase a cone of metallic thread.  It won’t work well on your home sewing machine.
      2.  Put in a new size 90 Metallic or 90 Topstitch needle.
      3.  Use Bottom Line in the bobbin.  Select a color that’s close to the color you are using on the top.  If you are using multiple colors, match your background with your bobbin thread.
      4. Set your top tension to “1”.
      5. Slow down
      6. Use the proper stabilization for your machine embroidery project or decorative stitching.
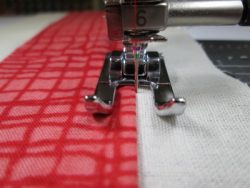
      7. The most important is how the thread is coming off the spool.  If you set a spool of metallic thread on the table and start pulling thread up, you will quickly see that it starts to twist like a garden hose.  If you pull the thread to the side of the spool and the spool turns with it, you won’t have any issues.  It will come off smoothly.


Thread Director on my Machine
Thread Director

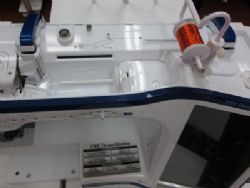
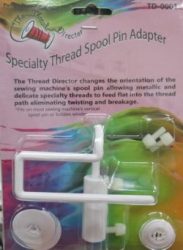
There is an accessory you can get for your machine called The Thread Director.  This little gadget makes it possible for your metallic thread to come off the spool so there are no twists or tangles.

It’s a funny looking gadget. I have a picture of it on my machine with metallic thread. You want to be sure that your spool will turn easily when the thread is pulled off.  Be sure there isn’t anything deterring the free movement such as paper stuck down in the spool hole.  You won’t have this issue with Brother or Sulky threads, but check if you are using another brand.


I hope you will give metallic thread another try if you haven’t had success.  You can find both Brother and Sulky threads on our website as well at the Thread Director.  Don’t forget your Metallic or Topstitch needles.  Check out all our Brother and Sulky Metallic Threads at Metallic Threads.


Invisafil – Hand applique by Machine

posted in: Classes, Thread | 0

I love hand applique, especially if I can do it by machine.  I am a thru and thru machine girl. I want my machine to help me if at all possible.  With a few setting and tension changes, the right needle and Invisafil thread, I can get the look of hand applique while accomplishing it on my machine.  Use Invisafil thread in the top and in the bobbin.  Set your top tension down a number.  My machine’s normal setting is “4” so I lower it to 3.  The thread is so fine and you don’t want the bobbin pulling to the top.

You need to prepare the applique as if it was going to be done by hand.  All the raw edges will need to be turned under using whatever method suits you.  Once that is done, either pin it to the fabric or use a glue stick to hold it in place. Keep the glue on the back in the middle of the applique.  You don’t want to stitch thru it.  You will experience skipped stitches and a gummy needle if you do. I always spray starch my background fabric to give me more support for my stitching.

Applique Stitch


  First select the correct stitch.  Since I can’t give everyone a number to find on their machine, I’ll give you a picture.  You will find it in your Utility Stitches.  There is nothing fancy about this one.  It takes about two stitches straight and then swings to the left.  The trick is to have it swing to the left just enough to catch the fold of your fabric. You will adjust the width of the stitch to be sure it catches just a bit of the fold.   The machine will always take two stitches, but you can determine how long those stitches will be.  Use a bit longer length if your applique has large straight areas.  Use a smaller stitch length if your applique is small or has lots of curves.

Needle drops off the fabric


Second, select the correct sewing foot and needle.  I suggest you use a 70 Microtex needle so that you don’t poke a big hole in your work.  You don’t need a large needle to take the Invisafil thread through the fabric.  The foot I suggest is an open-toe foot. This way you will be able to see that your straight stitching will fall just to the right of the fold and the swing to the left will just catch the fold of the fabric.  This is where you will want to do a practice and take a few stitches and try a smaller swing to see if it catches.  Remember, you want just enough to catch the fold of the fabric.


Pulled back to show stitches


In the picture on the left, I have pulled back the fold so you can see what the stitching looks like.  You can see that the thread is running along the edge of my fabric and the needle swings out to the left to just catch the fold.

In the picture on the left, I have pushed the fold back over the stitches.  That’s all it takes to hide them.  I get the look of hand applique, but I was able to accomplish it with my sewing machine and Invisafil Thread.

We have a great selection of colors on our website.  All you have to do is pick a color that is “in the ballpark” as the thread is so thin with a matte finish.  It will just blend in.

See the thread at Invisafil Thread and don’t forget to get a 70 Microtex needle.  Hope you will learn how your machine can help you accomplish the look of hand applique.

Invisafil Thread – Think Thin Thread!

posted in: Classes | 0

Have you ever noticed just how many threads are available for us to use.  Before I just jump in talking about Invisafil thread, let’s be sure we all understand how to tell what the thread you have selected is going to do.  Thread is assigned a “weight”.  To me, it’s just a number.  All I have to remember is that the lower the number the thicker the thread and the higher the number the thinner the thread.  Write it down if you have to because it is so important to your success in working with different threads.  We stock threads for the sewing machine that range from 12 to 100, with 12 being the thickest that will easily go thru a Topstitch needle and 100 being the very thinnest available.

In one of my previous posts I talked about 12 wt thread and how to set your machine for success. That’s the really fun thread because your stitches are so impressive, but there are times when you need a much thinner thread.  In fact, the thinner the better.

This time we are going to talk about a Invisafil Thread from Wonderfil Thread Company.  This little thread is a 100 weight polyester thread with a matte finish.  We prefer this matte finish thread to the invisible threads that are available only in clear and dark.  Those threads always have a little shine to them.  We have seen it suggested to use a cotton thread in the bobbin.   With Invisafil thread you will use the same thread on the top and on the bobbin.

Let me give you my little “cheat sheet” for the set up with Invisafil Thread:

  1.  Use invisafil in the top and the bobbin
  2.  The thread is so thin, you might want to loosen your top thesion by a number (ie. 4 to 3)
  3.  For applique,  use a 70 Microtex needle as you don’t need to punch a big hole for this thin thread.
  4.  For quilting, use an 80 Microtex needle to easily punch thru the batting.


We use Invisafil with raw edge applique.

The setting on my machine is just a normal zig zag stitch with a width of about 1.5 and a length of about 1.2.  The trick when doing this stitch is to keep the stitching on the fabric.  Ideally, it would be half on and half off the edge.  If you move totally on the fabric, you will be fine, but if you move totally off the fabric, you will see the stitching and should take it out.

Just a hint about fusing your fabric for raw edge applique.  When we get a complaint about skipped stitches or a gummy needle, we always ask about the length of time for the fusing.  Most of our customers with problems didn’t know that there are specific directions and times for each of the fusibles.  So before you begin working on your project, be sure you know how to properly use the fusible you have chosen. This will help eliminate these two issues.


We have also used Invisail for free-motion quilting as you won’t see your stitches.  This is a big plus to those of us who are not consistent in the stitch length.  If you like the “micro” quilting for detail, then this thread is just great for that.

We hope you will give Invisafil a try for applique, free motion stitching or other detail work when you don’t want the thread to show.  One of our gals loves this thread for hand applique as it truly doesn’t show.  It isn’t nearly as slippery as silk thread and thinner than cotton.   You can find Invisafil thread on our website.  There are 60 colors, but you only have to be in the ballpark to find a shade that will work for your project.  You can see them all at Invisafil Thread .


Decorative Stitching – Glam Bag

posted in: Classes | 0

In our recent Decorative Machine Stitching Lesson 1 post we gave you the set up for success in working with 12 wt thread on your sewing machine.  Hope you have a chance to try it and see how wonderful those stitches look when done with a heavy thread using a 100 Topstitch needle. (Be sure and read the Decorative Stitching Lesson 1 Post for the correct setup).

Practice Piece


I had so much fun playing with the thread myself that I wanted to share an idea about how to use those “practice” pieces. This is what my first practice piece looked like.  It’s pretty much a mess to most people, but it lets me see what stitches I like.  Some might write down the length and width of the best ones which is a fine idea, but I am lucky to have a machine that will remember that for me!  With this practice piece I can refer back to it, and try different stitches as I go along.  If I want to try another stitch, I just put in on the practice piece.


Once I got going, I thought it would be a good idea to use just one color of thread so I could concentrate on the stitches. I just drew a line and did diagonal stitching.  I originally had spaces and rows, but I just kept putting stitches on until it became boring.  I just didn’t know when to quit.  I’ll cut this up and use parts of it in another project…someday!!


I decided to add more color and sew them in rows.  It gave me more variety and was much more interesting.


I discovered a new stitch.  I used a stitch that had one straight side to it.  After stitching it, I  used the mirror image button on my machine and stitched it again.  It became a wider stitch than what appears to be possible on a sewing machine.  I love that.  Now it didn’t exactly line up in the middle, so I ran a triple straight stitch in a contrast color down the middle to cover the gaps.  It made a wonderful design.  It’s fun to discover a “new” stitch!  I know your machine has some stitches that would work just like this one


Once I had enough practice pieces, I wanted to make something.  I used one of our favorite little bag patterns called Little Glam Bag.  It gave me some great divisions to use my small pieces.  If you haven’t tried this pattern it is a simple little pouch and is a great way to use your decorative practice pieces.  You can order this pattern on our website at Glam Bag.

If you are close to the shop, come by and I’ll show you my Glam Bag.  It’s fun to play, but it’s great to have a finished project!